Image Control
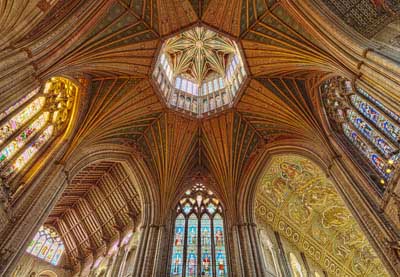
Maintaining acceptable detail in the dark shadows of the carved wood or stone crevices and the detail of the brightly lit stained glass is one of obvious parameters that the indoor photographer needs to consider. Another image control is the deformation caused by tilting your lens in an upwards or downwards direction causing the classic converging vertical lines, this can often be pleasing and providing some degree of artistic flare but it can be also be disturbing and distort the viewing experience.
Contrast Control
Controlling contrast is one of the biggest technical issues. You will need to deal with the situation where you have blocked out shadow areas with no detail and at the same time you have windows with blown out highlights again with no details. You can expose for one or the other but normally it is impossible to expose for both in a single image. Now this is where film has a current advantage, as black and white negative film and its associated prints can span 19 stops of dynamic range while my digital camera can successfully cover only 9 or so in a single frame even using the most optimized ISO setting (in my case 100 ISO). Fortunately there are digital processing techniques to get around this, one technique I have found that works well is taking multiple exposures of the same image and then applying HDR software and then enhancing with local contrast software (I know this is a bit tedious but then so was working in the dark room). For this technique to be used successfully you need a tripod and a delay shutter release. To make sure I cover the full dynamic range range, I rely heavily on the RGB (red blue and green) histogram that can be displayed on viewing screen of any digital SLR’s. I start with an “averaged” exposed image and then move in one stop increments until full dynamic range on both ends of the spectrum are covered. At times I have needed 5 stops below and above the average exposure to cover the entire dynamic range of a scene (i.e. about 19 stops of dynamic range). All brands of cameras are different so you will have to experiment a little bit on what is really needed for your camera and the amount of noise you find that is acceptable or desire. With mine I find I need the low value light areas covered well or the noise levels are a bit high, this is especially important to capture quality details of wood work as this is often the darkest and most details part of the cathedral (i.e. in the quire). I also like to have the details of the windows with a natural amount of brightness to show that the windows are a main source of light, this means that they generally appear slightly overexposed as this is what we would expect we would think to see.
A typical image taken in the alter area would be 5 images taken at +2 stops, +1 stop, average exposure, -1 stop and -2 stops taken at constant f11, ISO 100. I usually shoot at the smallest aperture that is allowed by my sensor with out causing noticeable diffraction.
Perspective Correction
Due to the dizzying heights and that the camera is normally located at ground level, converging verticals will be existent, a shift lens can help, I had one for my old Canon FD system but haven’t splurged yet with my digital gear. With some brief editing in Photoshop or similar software you can simulate a shift lens with only slight noticeable pixel image quality loss. You can make brilliant photos either by keeping the converging vertical lines or by correcting them to provide a more natural looking perspective. Correcting the perspective is made much easier if you originally composed well and spent time before hand thinking about how you want the final image to look. One thing that I seem to keep relearning the hard way is not to compose your photo from the top down, meaning to not frame based on the top of the frame but at the bottom, because if you start at the top you will in advertently cut off the bottom corners if you decide to “straighten” the photo due to converging verticals. Start at the bottom and leave an extra 5 to 10% of space at the bottom corners so you have working room for after your perspective control is done. I have had a number of finished photos where I have had to be quite creative with the bottom corner “blank” triangles and its hard to clone something out of nothing. I only do perspective control in CS6 using an image as a smart object, this makes manipulation much easier. The examples given on the other pages will provide more details on this.