Contrast and Perspective Management
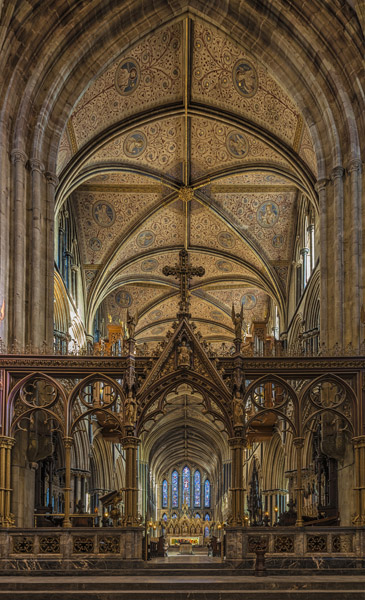
Let us look at an example from Worcester Cathedral. This image was taken on a sunny winter morning. From the final image (finished image on right) you can see the bright sun resulted in some burned out highlight areas so you will also get to see how I handled contrast in this image. Below are the original images I started with. As you can see I did not even have the images leveled properly, which meant I was in a rush as someone was likely walking around so I needed to get my sequence taken very quickly. The images though were all taken from a sturdy tri-pod using a 2 sec delay with mirror lock-up.

So lets start the processing. I always start with basic lens correction, colour control and some shadow expansion in Camera Raw, these settings are made on the “average” image and then saved on all the images I wish to merge for contrast control. I normally leave all perspective control and cropping until the histogram is expanded. I usually use HDR Pro in CS6 but any other similar software will work just fine. After running HDR Pro on the selected images in CS6 I usually drop the highlights further than the default to get as much detail in the windows and in this case to find detail on the sunlit wall. Once the HDR image is created in CS6, I then start the perspective correction to get the image to “appear” as my eyes saw it. I do this by converting the HDR image to a Smart Object and then use the Rotate Transform tool and the Distort Transform tool to correct the verticals and horizontals as needed. While using the Distort tool this normally means expanding the top and contracting the bottom of the image. I control with both the top and the bottom of the image to help maintain detail in the image. For example if you were just to expand the top to gain all the perspective control then the quality appears to worsen in this area. You now have a corrected perspective but this image can look unnatural and stretched, so I then use the “Warp” tool to pull down the top of the image to get it to look more like what I remember (see below). You have to play with the warp tool to get the shape you want to see. This is also the tool that works real good to straighten the building (most cathedrals are not all that straight) so the lines flow to the corners in a more perfect fashion and so all is level to the eye. You will now see the dreaded “blank” corners at the bottom of the image, this is where I have learned to compose from the bottom up to make sure you leave lots of working room at the bottom. To fix this picture though I would have needed a wider lens that I did not have with me. I don’t fix blank areas until the final cropping is done and the image is flattened. The next step is cropping. While still working with the image as a smart object I crop the image making sure my corners all work. I also may use the Warp tool to further straighten or align the corners. Now I flatten the image and use this image to get rid of the blank areas, burn and dodge the highlights and dark areas and other micro changes warranted.
The final step is enhancing detail and sharpening the HDR image. There are a lots of ways to do this and here I will run through two methods: 1) Akvis Enhance tool and 2) CS6 Sharpening tool. The Akvis Enhancer tool is a very simple and effective way to enhance local contrast control and works really well to bring life back to a flat HDR image. The tool can be adjusted to match your taste for contrast, shadow and highlight detail. After using this filter I then finish off with a curves adjustment and then adjust the opacity of each layer to not make the image does not look to over the top for my taste. The same look can also be achieved using CS6, but this takes a bit more time and involves a bit more trial and error. Basically you need to apply an Unsharpen Filter several times overtop of the same layer. Start at 50% Radius 0.2 and then apply, next “fade the Unsharpen mask” (under the Edit tab) and use an opacity of 20%. Repeat this for Radius of 0.5, 1, 2, 5 and 10. You can change the parameters as you see fit but this generally works ok.